> ## Documentation Index
> Fetch the complete documentation index at: https://help.lobstr.io/llms.txt
> Use this file to discover all available pages before exploring further.
# Export scraped data automatically to Amazon S3
> Attach an AWS S3 bucket to your Squid so every completed run uploads its results there automatically — including how to create the bucket, the IAM policy, and the access keys.
If your data pipeline already reads from S3, you can skip the download-and-upload step entirely. Attach a bucket to your Squid and lobstr.io writes the results there itself every time a run completes.
Most of the work is on the AWS side: a bucket, a narrow permissions policy, and a dedicated user whose keys you paste into lobstr.io. The lobstr.io part is three fields.
## Before you start
* A [lobstr.io account](https://app.lobstr.io) with a Squid you've already configured.
* An AWS account. If you don't have one, [sign up with AWS](https://portal.aws.amazon.com/billing/signup) first.
## Part 1 — Set up AWS
Open the [S3 console](https://s3.console.aws.amazon.com/s3/buckets) and click **Create bucket**. Set the region using the dropdown in the top-right corner before you start.
Enter a globally unique **bucket name** using only lowercase letters, numbers, and hyphens.
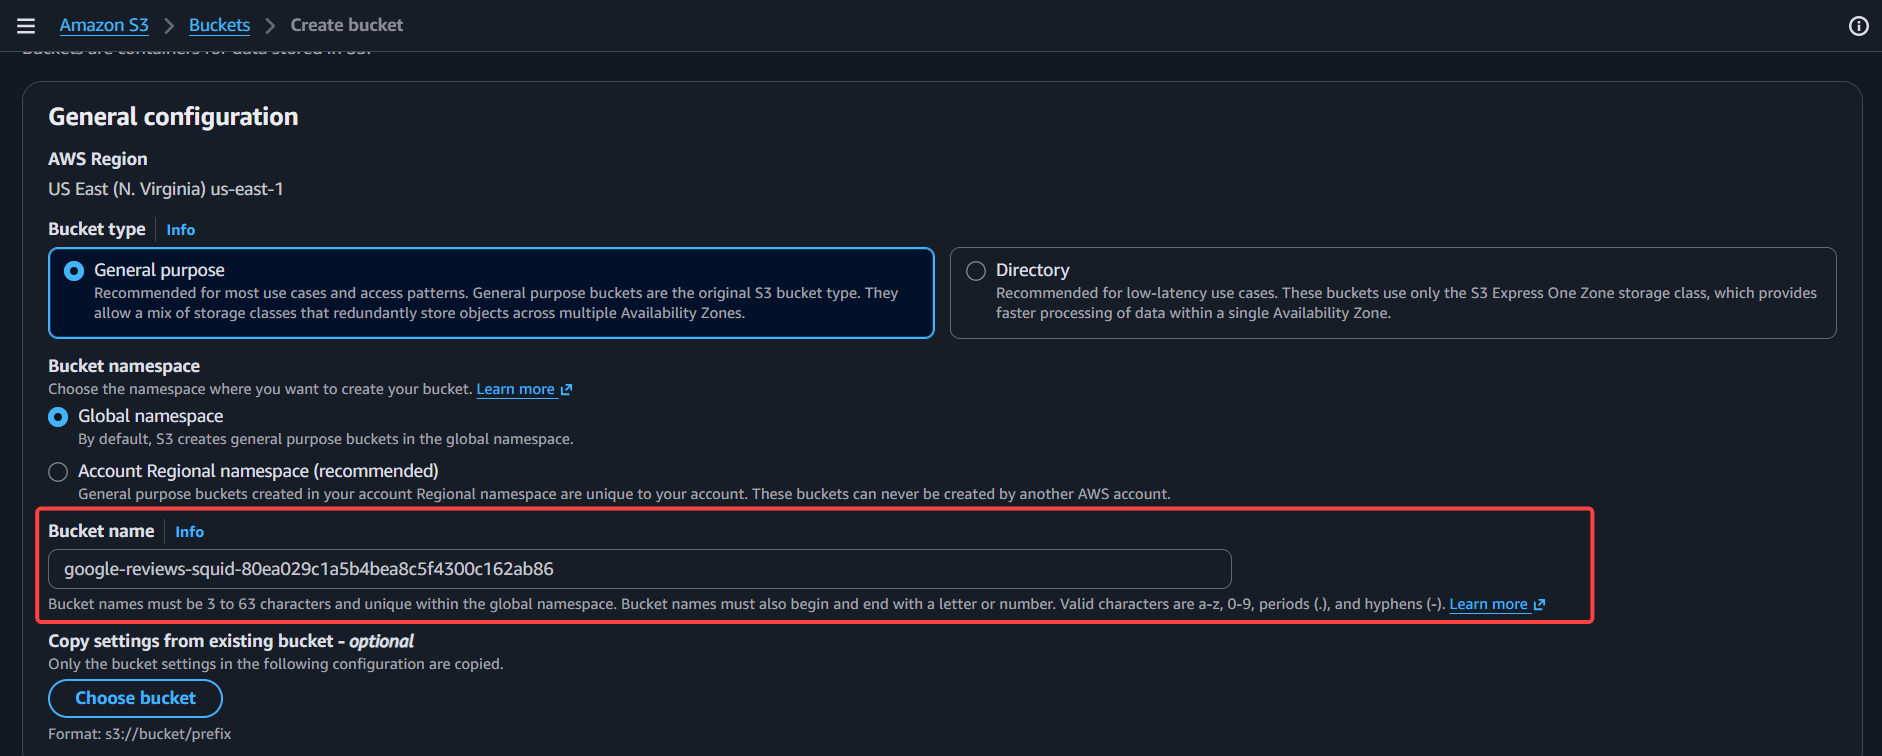 Leave everything else at its defaults — **Bucket type** on General purpose, **Bucket namespace** on Global, and **Block all public access** switched on. Click **Create bucket**.
Avoid dots in the bucket name. They're technically allowed, but they break TLS certificate matching for virtual-hosted-style requests and cause problems that are annoying to diagnose later.
Go to **IAM** → **Policies** → **Create policy**. Switch the editor to the **JSON** tab and replace the contents with this, substituting your own bucket name:
```json theme={null}
{
"Version": "2012-10-17",
"Statement": [
{
"Effect": "Allow",
"Action": "s3:PutObject",
"Resource": "arn:aws:s3:::your-bucket-name/*"
}
]
}
```
Leave everything else at its defaults — **Bucket type** on General purpose, **Bucket namespace** on Global, and **Block all public access** switched on. Click **Create bucket**.
Avoid dots in the bucket name. They're technically allowed, but they break TLS certificate matching for virtual-hosted-style requests and cause problems that are annoying to diagnose later.
Go to **IAM** → **Policies** → **Create policy**. Switch the editor to the **JSON** tab and replace the contents with this, substituting your own bucket name:
```json theme={null}
{
"Version": "2012-10-17",
"Statement": [
{
"Effect": "Allow",
"Action": "s3:PutObject",
"Resource": "arn:aws:s3:::your-bucket-name/*"
}
]
}
```
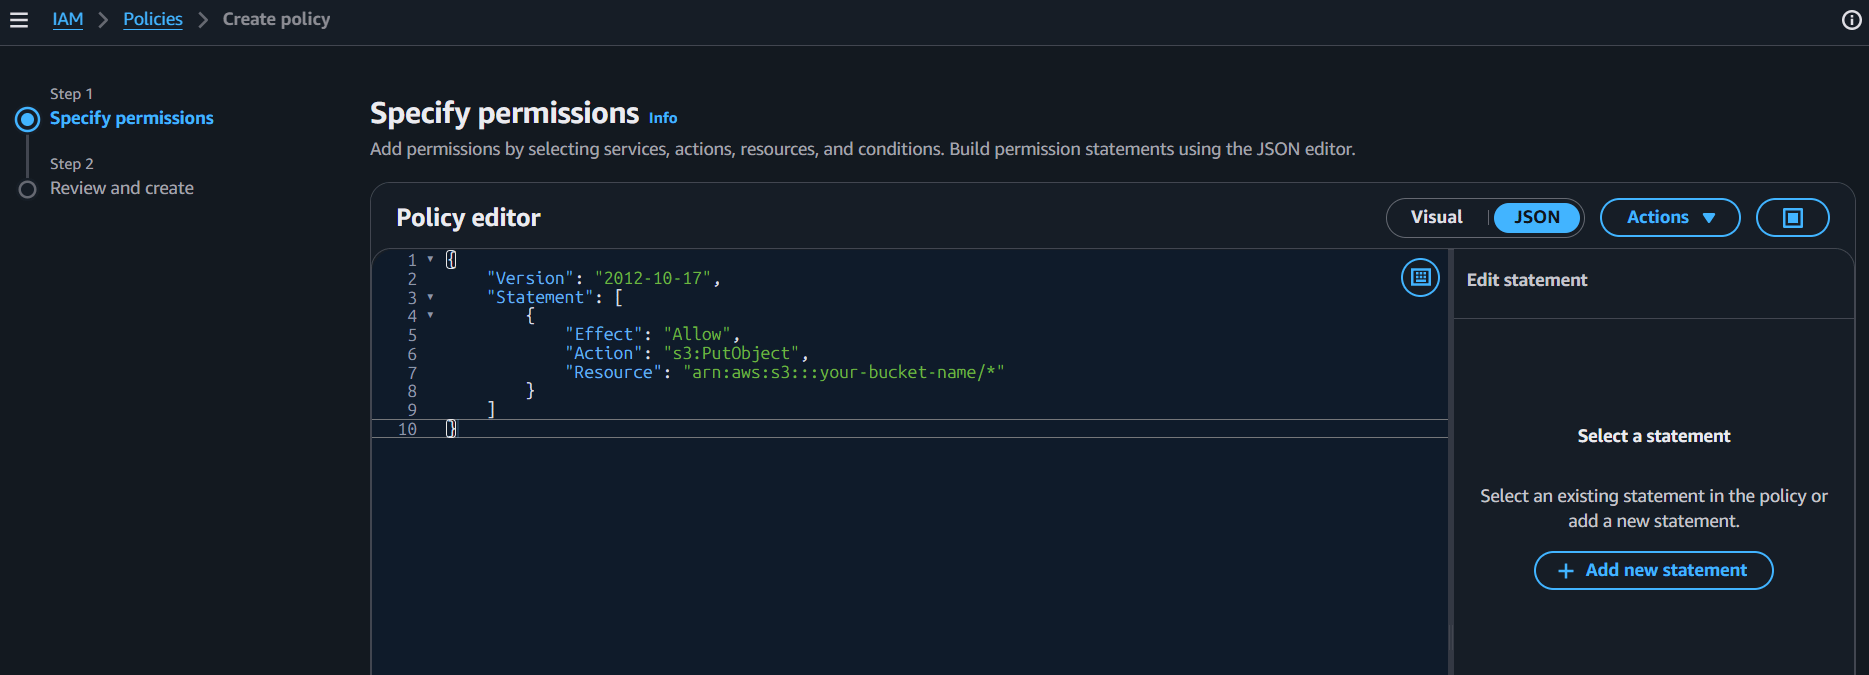 Click **Next**, name it `lobstr-delivery-write`, and click **Create policy**.
This grants permission to write files to that one bucket and nothing else — it can't read, can't delete, and can't touch any other bucket in your account.
In IAM, go to **Users** and click **Create user**. Name it `lobstr-delivery` and leave the console-access checkbox unticked — this user authenticates with keys only.
Click **Next**, name it `lobstr-delivery-write`, and click **Create policy**.
This grants permission to write files to that one bucket and nothing else — it can't read, can't delete, and can't touch any other bucket in your account.
In IAM, go to **Users** and click **Create user**. Name it `lobstr-delivery` and leave the console-access checkbox unticked — this user authenticates with keys only.
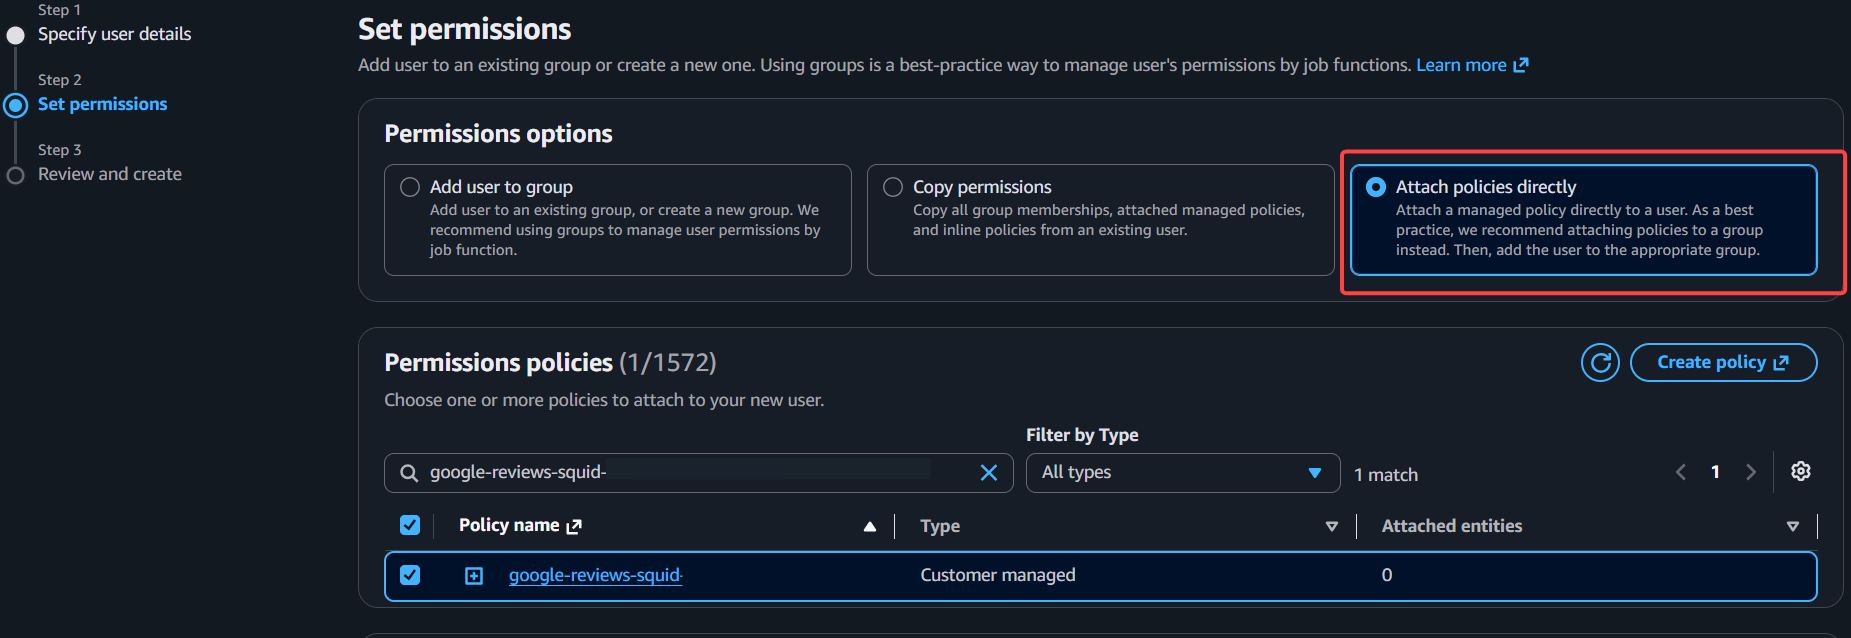
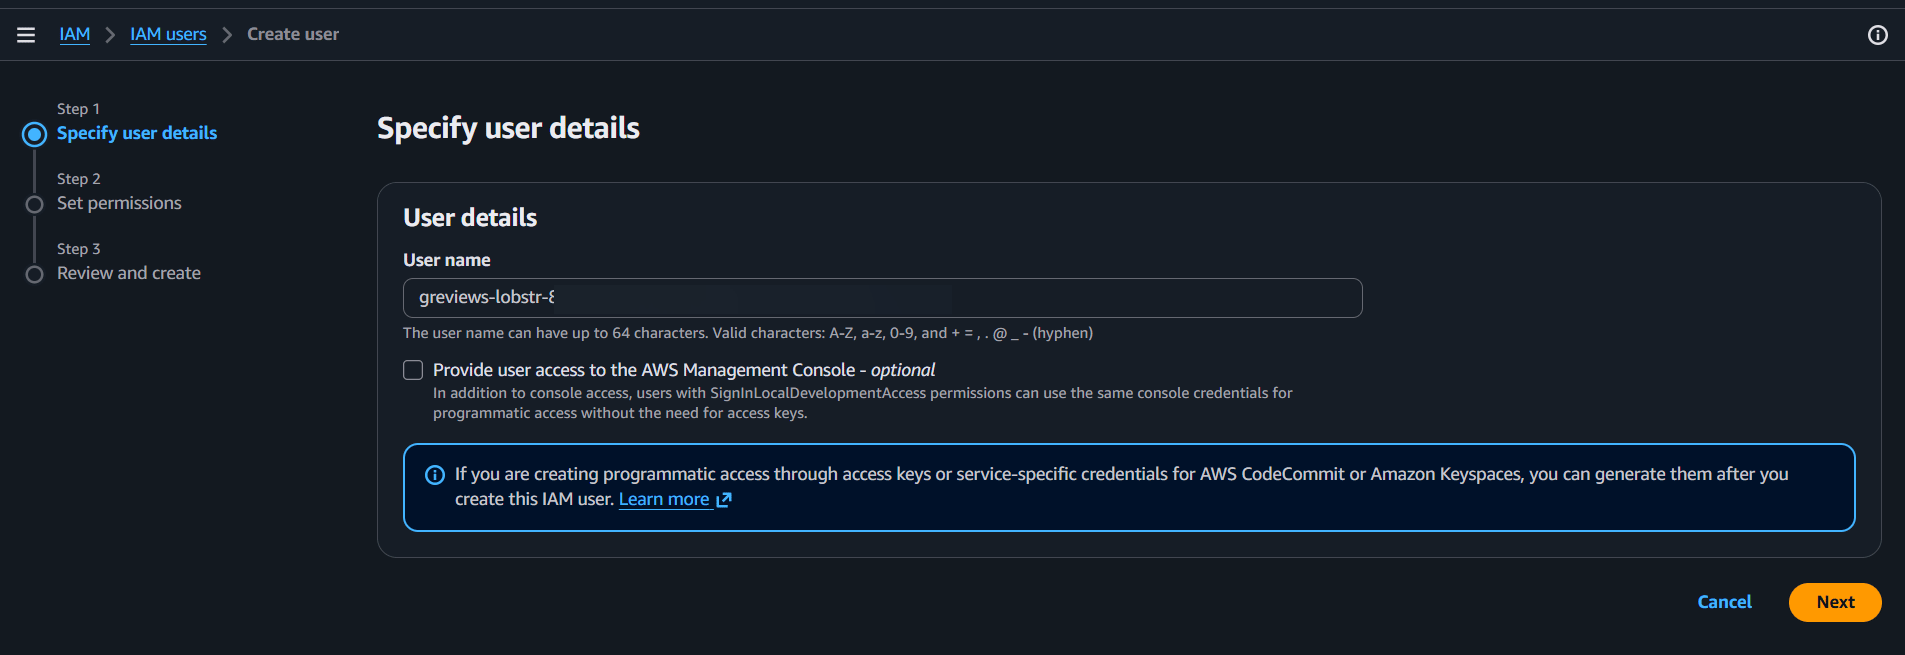 On the next screen, choose **Attach policies directly**, tick `lobstr-delivery-write`, then click through and create the user.
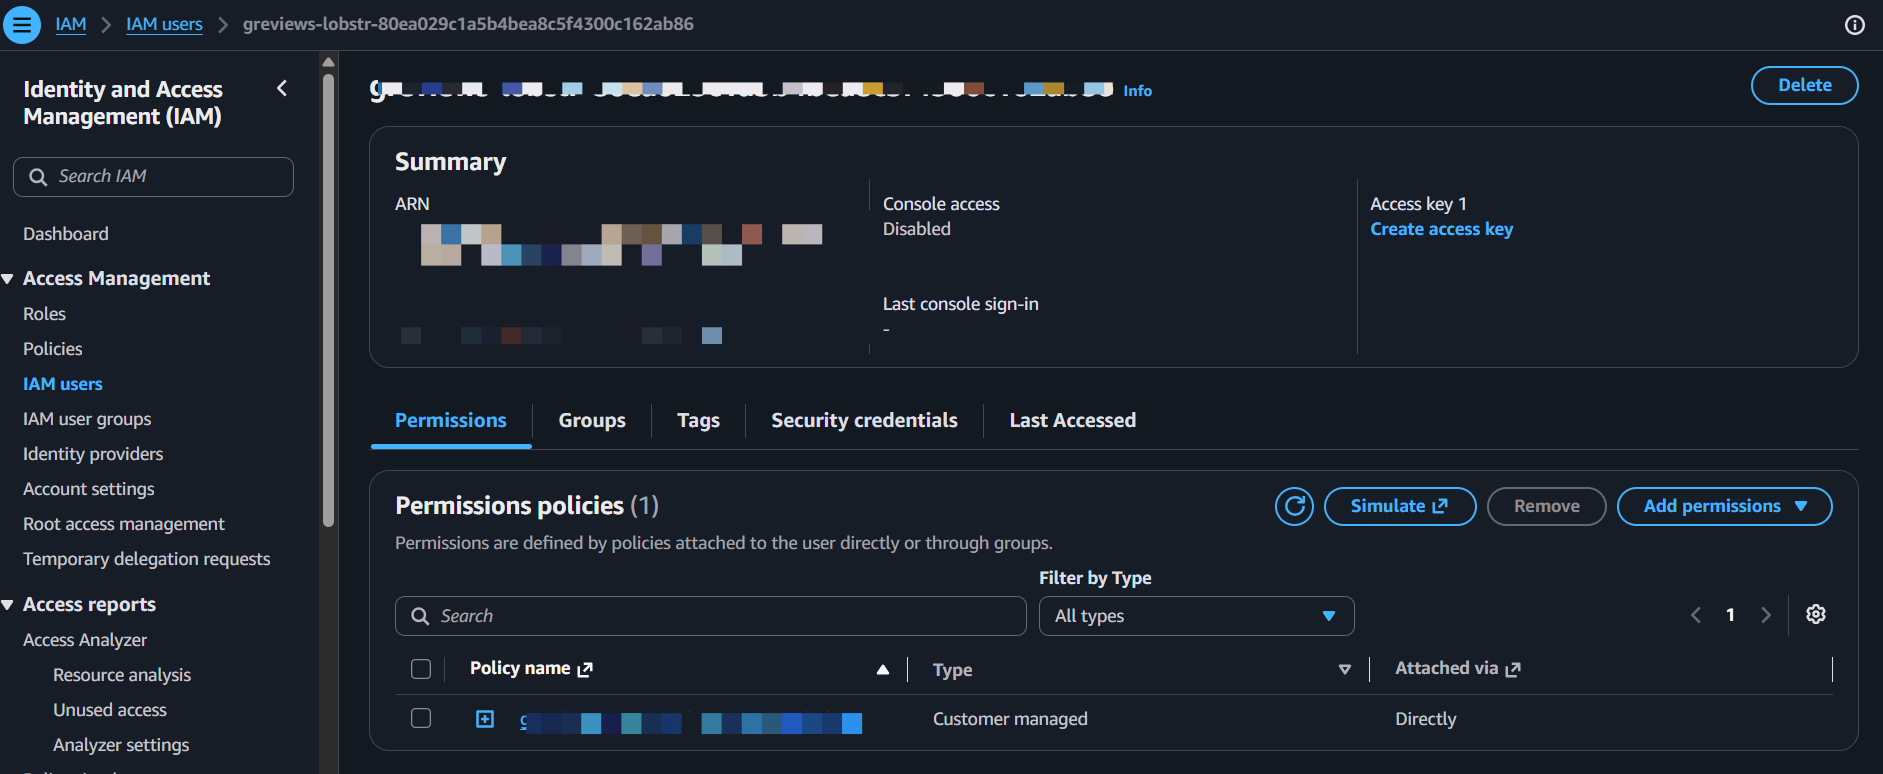
 Open the new user and click **Create access key** in the **Access key 1** panel.
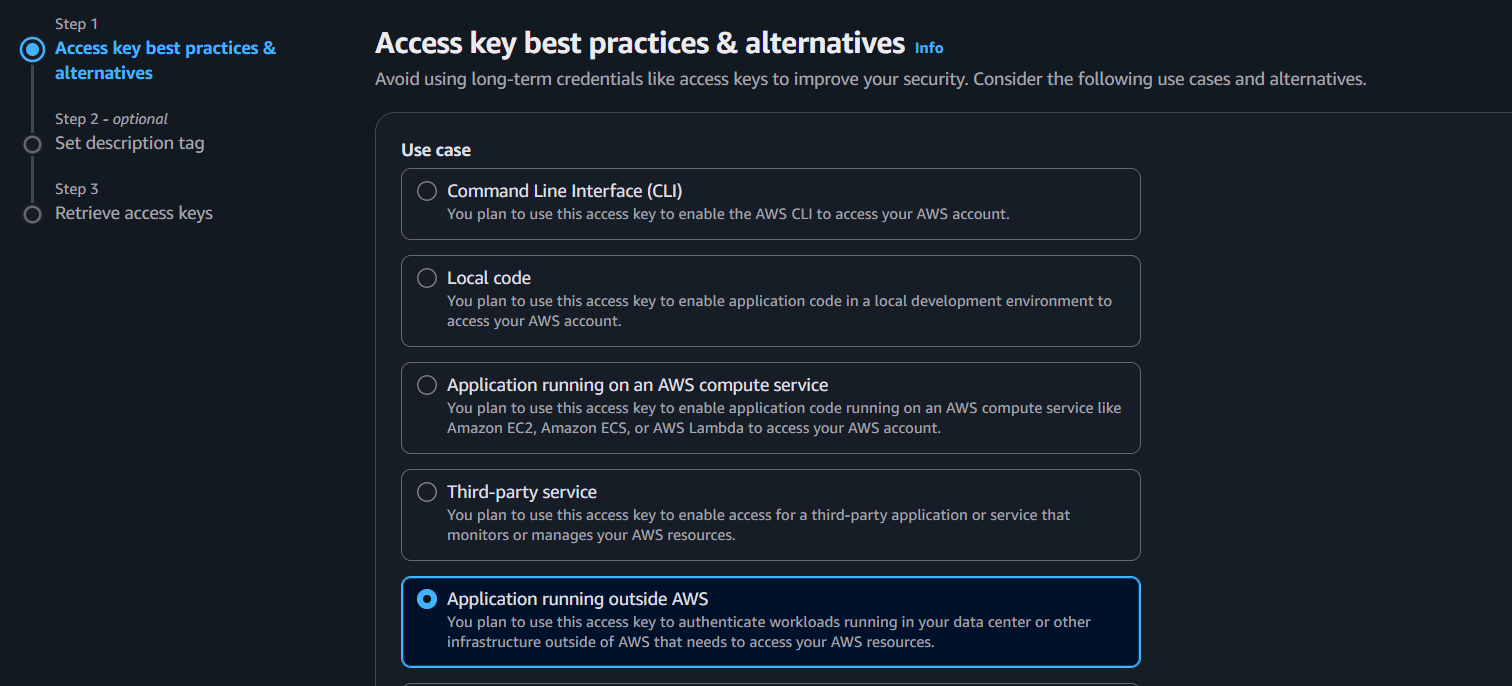
 Choose **Application running outside AWS**, skip the description tag, and click **Create access key**.
 Copy both the **Access key** and the **Secret access key** now.
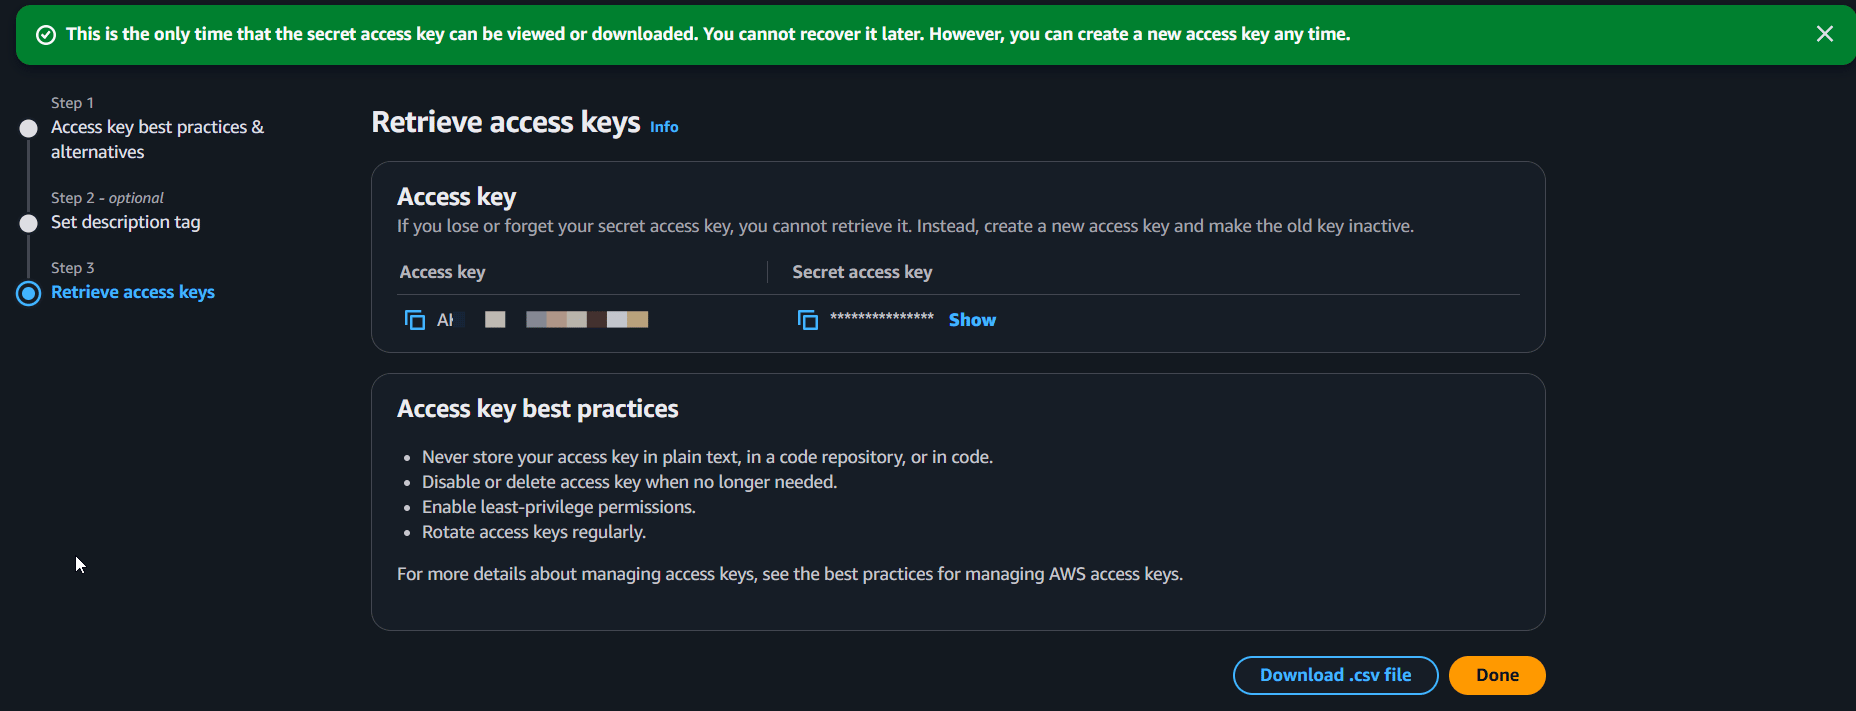 The secret access key is shown **only on this screen** and can't be retrieved afterwards. Copy it now, or download the `.csv`. If you lose it, you'll have to create a new access key and deactivate the old one.
## Part 2 — Connect it to your Squid
In your lobstr.io dashboard, open the Squid, go to its **Delivery** settings, and expand the **Amazon s3** section.
Enter the bucket name in **Bucket**, then paste the access key and secret key into their fields.
The secret access key is shown **only on this screen** and can't be retrieved afterwards. Copy it now, or download the `.csv`. If you lose it, you'll have to create a new access key and deactivate the old one.
## Part 2 — Connect it to your Squid
In your lobstr.io dashboard, open the Squid, go to its **Delivery** settings, and expand the **Amazon s3** section.
Enter the bucket name in **Bucket**, then paste the access key and secret key into their fields.
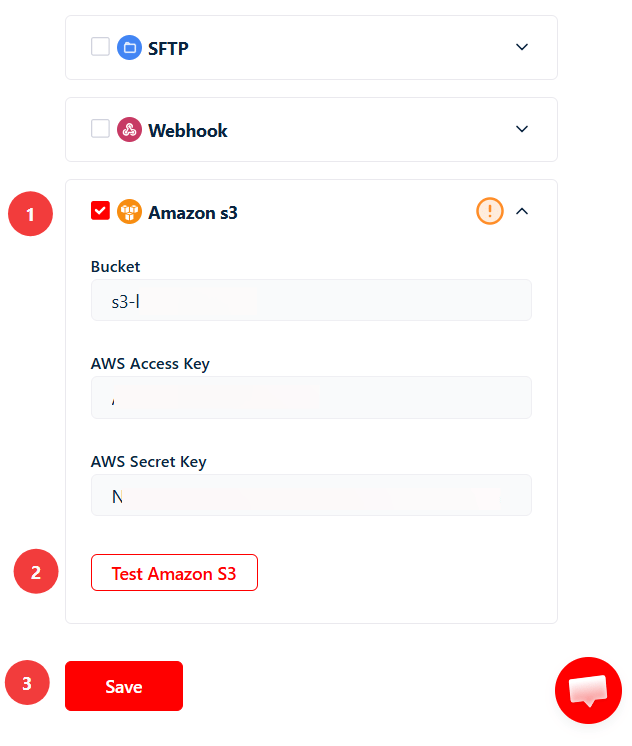 Enter the bucket name on its own — `my-bucket`, not the full `s3://my-bucket` URL.
Click **Test Amazon S3** before saving. A pass confirms the credentials and permissions are correct.
If it fails with an access-denied error, the bucket name in the policy ARN doesn't match the bucket name in the form.
Tick the checkbox beside **Amazon s3** to activate the integration, then click **Save**.
Filled-in credentials with the box left unticked means deliveries won't fire. The fields and the checkbox are separate — you need both.
Click **Launch**. When the run completes, open the bucket in the S3 console — the results file appears there within about a minute.
Files land at the **root of the bucket**, named after the Squid plus the run's UTC timestamp:
```
Google Maps Reviews Scraper (12)_2026-09-03T16:03:06.899628+00:00.csv
```
Enter the bucket name on its own — `my-bucket`, not the full `s3://my-bucket` URL.
Click **Test Amazon S3** before saving. A pass confirms the credentials and permissions are correct.
If it fails with an access-denied error, the bucket name in the policy ARN doesn't match the bucket name in the form.
Tick the checkbox beside **Amazon s3** to activate the integration, then click **Save**.
Filled-in credentials with the box left unticked means deliveries won't fire. The fields and the checkbox are separate — you need both.
Click **Launch**. When the run completes, open the bucket in the S3 console — the results file appears there within about a minute.
Files land at the **root of the bucket**, named after the Squid plus the run's UTC timestamp:
```
Google Maps Reviews Scraper (12)_2026-09-03T16:03:06.899628+00:00.csv
```
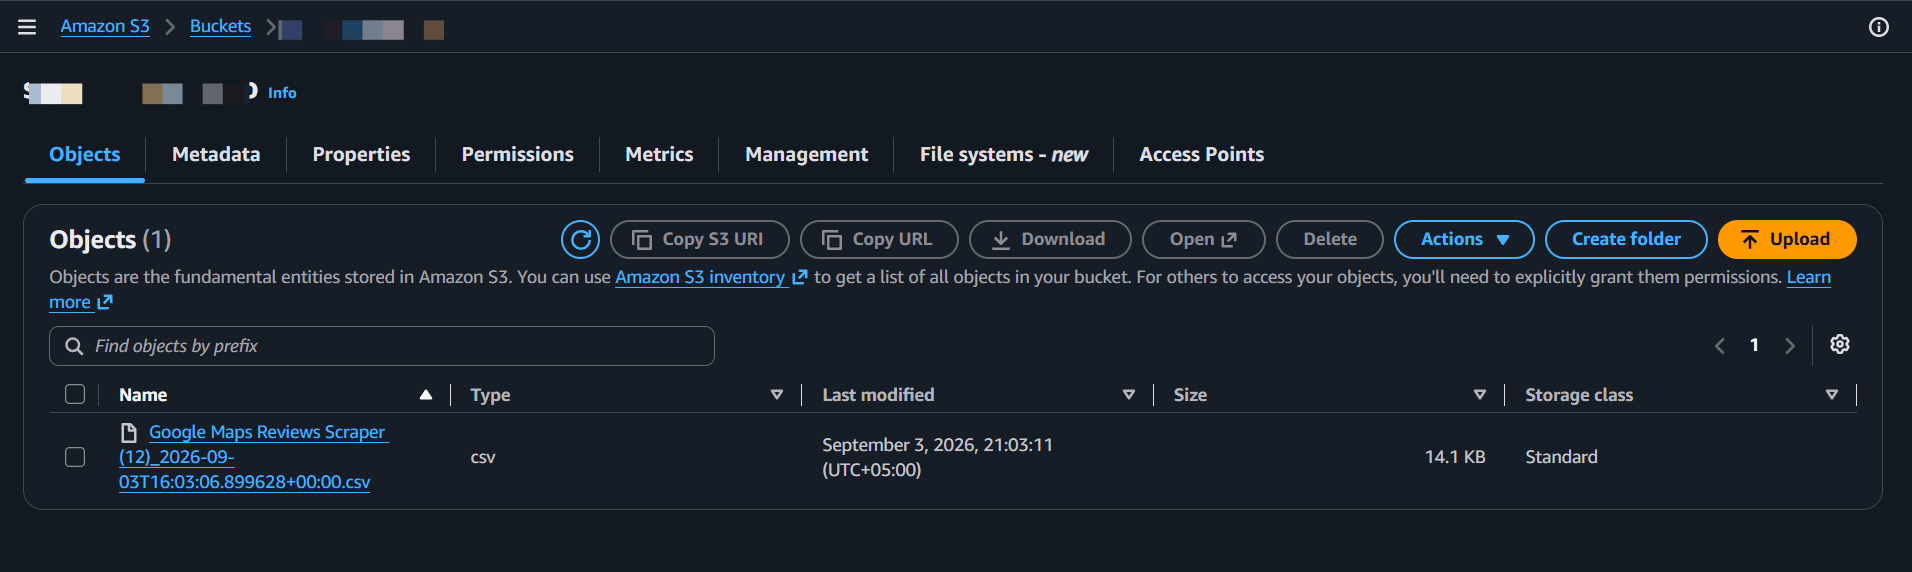 Every subsequent run drops a new file automatically, including scheduled ones. Nothing is overwritten — the timestamp keeps each run's file distinct.
## Troubleshooting
The bucket name in the policy ARN doesn't match the bucket you entered in lobstr.io. Open the policy in IAM and check the `Resource` line — it needs your real bucket name and must end in `/*`.
Either the bucket name is mistyped, or the bucket is in a different region than the one you're looking at. Bucket names are global, so a typo can also mean you're pointing at a bucket that isn't yours.
Usually the secret key was copied with trailing whitespace. Re-paste both values carefully. If the secret is lost, create a new access key in IAM and deactivate the old one.
Check the **Amazon s3** checkbox is ticked and that you clicked **Save**. A successful test doesn't activate the delivery on its own.
## Things to know
* **Delivery applies to future runs only.** Runs that finished before you set this up aren't uploaded retroactively. To backfill, use the green **Download** button to grab the combined CSV and upload it yourself.
* **S3 delivery is per Squid.** Configure it separately on each Squid you want writing to a bucket.
* **You can combine delivery channels.** Amazon S3, [Google Sheets](/integrations/google-sheets), SFTP, email, and webhooks each have their own checkbox in the Delivery panel and can all be active at the same time.
* **Rotate the key if it's ever exposed.** Create a new access key in IAM, paste it into the Delivery panel, save, then deactivate the old key. The narrow policy means the worst case is writes to one bucket — which is exactly why the dedicated user is worth the extra two minutes.
Every subsequent run drops a new file automatically, including scheduled ones. Nothing is overwritten — the timestamp keeps each run's file distinct.
## Troubleshooting
The bucket name in the policy ARN doesn't match the bucket you entered in lobstr.io. Open the policy in IAM and check the `Resource` line — it needs your real bucket name and must end in `/*`.
Either the bucket name is mistyped, or the bucket is in a different region than the one you're looking at. Bucket names are global, so a typo can also mean you're pointing at a bucket that isn't yours.
Usually the secret key was copied with trailing whitespace. Re-paste both values carefully. If the secret is lost, create a new access key in IAM and deactivate the old one.
Check the **Amazon s3** checkbox is ticked and that you clicked **Save**. A successful test doesn't activate the delivery on its own.
## Things to know
* **Delivery applies to future runs only.** Runs that finished before you set this up aren't uploaded retroactively. To backfill, use the green **Download** button to grab the combined CSV and upload it yourself.
* **S3 delivery is per Squid.** Configure it separately on each Squid you want writing to a bucket.
* **You can combine delivery channels.** Amazon S3, [Google Sheets](/integrations/google-sheets), SFTP, email, and webhooks each have their own checkbox in the Delivery panel and can all be active at the same time.
* **Rotate the key if it's ever exposed.** Create a new access key in IAM, paste it into the Delivery panel, save, then deactivate the old key. The narrow policy means the worst case is writes to one bucket — which is exactly why the dedicated user is worth the extra two minutes.